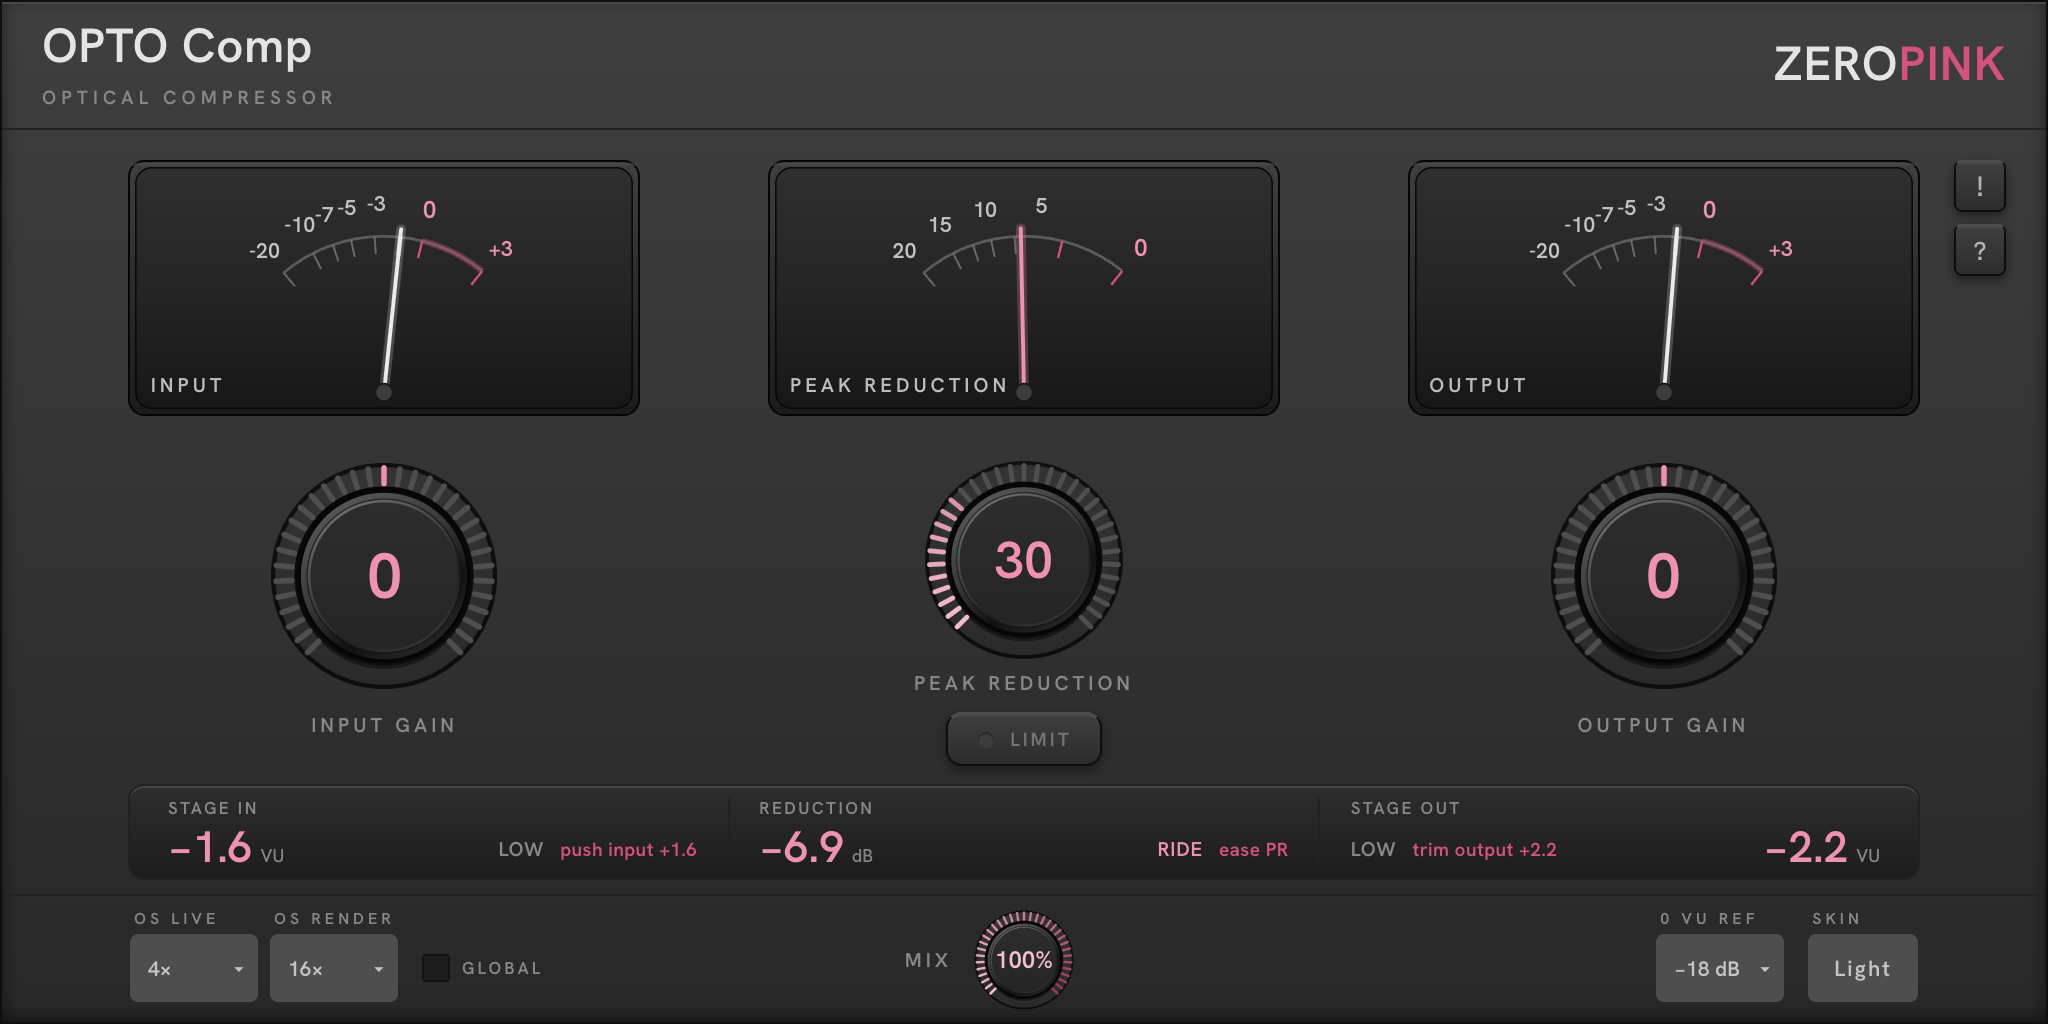
Before anything else: get to zero
OPTO Comp assumes you have set your level before you start compressing. That is not housekeeping — it is the whole method, and every ZEROPINK plugin is built around it.
0 VU = −18 dBFS. That is the reference the meters are calibrated to, and it is where analogue equipment expects to be fed. Modern digital sessions routinely run 15–20 dB hotter than this, which is why compressors that sound effortless on one engineer's mix sound crushed and lifeless on another's. Same plugin, different starting level.
So the first move is always the same:
- Play the loudest section of the part.
- Bring the INPUT needle to around 0 VU, drifting a little either side. Clip gain / region gain in your DAW is the better fix — it corrects the level at source, so every plugin downstream inherits a sane starting point. INPUT GAIN on the plugin is for trimming from there, and for driving the optical element harder once the staging is right.
- Only then reach for PEAK REDUCTION.
The STAGE IN readout underneath tells you exactly how far off you are and what to do about it. It does not report a number and leave you to interpret it — it names the state and prescribes the correction:
That reads: you are 5 dB below reference, and the fix is to add 5 dB of input gain. When you land, the state word changes and the prescription disappears.
Do this once, properly, and the compressor's controls will behave the way their labels suggest. Skip it and you will spend the session fighting the ratio.
What OPTO Comp is
A digital model of an optical compressor. In the hardware it emulates, gain reduction is done by a light source and a photocell: signal drives the light, the photocell's resistance changes in response, and gain falls. The photocell is slow and slightly imperfect, and those imperfections are the sound.
OPTO Comp reproduces that behaviour in software rather than reproducing any one manufacturer's unit. What matters is not the circuit diagram but what the mechanism does to audio — and it does things that a threshold-and-ratio design cannot express, which is why the controls here are not the ones you may expect.
It is program-dependent. The photocell's recovery is not one speed. It releases quickly at first, then slows as it settles — a fast initial recovery followed by a long tail. Loud passages leave the cell "tired" and it recovers differently than after a quiet one. The compressor is therefore always responding to what came just before, not only to what is passing through it now.
It has no ratio control, and that is not a simplification. In the circuit being modelled, ratio is not a setting — it emerges from the photocell's own curve and the amount of reduction you ask for. Push harder and the effective ratio rises on its own. Adding a ratio knob would mean inventing a parameter the mechanism does not have.
Vocals, bass, acoustic guitar, program material, drum busses — anything where you want the level held without hearing it being held. It is a smoothing tool. It rounds and settles.
Catching fast transients. The optical attack is unhurried by design — a snare's crack is gone before the cell responds. That is FET territory. Using OPTO Comp for it lowers everything after the transient, which usually makes it stick out more, not less.
The three meters
All three are true VU — around 300 ms integration, IEC/ASA ballistics. They show what you would feel, not sample peaks. They deliberately do not respond to instantaneous peaks, which is why they read as musical level rather than as digital peaks.
INPUT — level arriving at the compressor, after INPUT GAIN. This is the one you set first. Target 0 VU.
PEAK REDUCTION — how much gain is being removed, reading right to left from 0. The needle should move like a musician breathing, not twitching. If it is slamming and holding, you are asking too much of an optical circuit.
OUTPUT — level leaving the plugin, after OUTPUT GAIN. When the compressor is set well and output gain is matched, this needle should sit around 0 VU alongside the input needle.
INPUT and OUTPUT share one scale — −20 · −10 · −7 · −5 · −3 · 0 · +3 — with the stretch above 0 marked in pink. That region is not a warning light; it is part of the scale.
The controls · INPUT GAIN
Trim into the compressor. This sets how hard the signal hits the optical element, and on an optical compressor that is the primary expressive control — more input means more reduction and a steeper effective ratio, because both come from the same physical mechanism.
Set it to reach 0 VU on the INPUT meter, then use it as your drive control.
Reading the prescription. STAGE IN names your position against reference in three states:
The number beside the prescription is the exact correction, so there is nothing to calculate. Follow it and the state resolves.
Each stage prescribes against its own control: STAGE IN sends you to INPUT GAIN, STAGE OUT to OUTPUT GAIN, with the sign carrying the direction.
PEAK REDUCTION
The amount of compression. Higher values ask for more gain reduction.
This is a single control that governs both depth and, indirectly, character. There is no threshold and no ratio because the optical circuit does not separate them. Turn it until the PEAK REDUCTION needle moves the way you want to hear.
Reading the prescription. The REDUCTION readout names how hard the compressor is working. KISS is the first rung of a four-state ladder, each state fixed to an amount of gain reduction:
The prescription beside the state tells you what to do to move between them — ease PR to back off, or its counterpart to push further.
LIMIT · OUTPUT GAIN · HELP
LIMIT engages a limiting mode on the optical element, steepening the effective ratio toward brick-wall behaviour rather than the gentler compression curve. Because ratio on an optical circuit emerges from the mechanism rather than a setting, LIMIT is how you ask for the steep end of that behaviour without a ratio control existing. Use it when you need a ceiling held rather than a level shaped.
OUTPUT GAIN makes up the level the compressor removed. Because everything in ZEROPINK is referenced to 0 VU, the goal is not "as loud as possible" — it is to return to reference so you can judge the compression rather than the level increase. The STAGE OUT readout prescribes in both directions — trim output +n when you are short of reference, trim output −n when you have overshot — and confirms when you arrive with IN/OUT matched ✓. Matched means input and output are at the same level, so bypassing the plugin is an honest comparison. Louder always sounds better for the first few seconds; this removes that illusion from the decision.
HELP — two small caps at the top right of the meter row. ! latches: press it and the panel enters help mode — hover any control and a card rises with a one-line explanation. It changes nothing about the audio. ? opens this manual.
MIX · 0 VU REF · SKIN
MIX — parallel blend. 100% is fully compressed. Lower values blend the uncompressed signal back in, giving you New York–style parallel compression without a second bus. Try heavy reduction at 30–50% mix on drums.
0 VU REF — the reference calibration. Five settings: −18 · −21 · −24 · −27 · −30 dBFS. −18 is the default and the right choice for program material — vocals, bass, guitars, busses, mixes.
The lower settings are for percussive instruments. A snare or a kick has a very high crest factor: the peak sits far above the average the VU is reading. At −18 the needle can sit politely near 0 while the actual peaks are already close to the ceiling. Dropping the reference to −24 or −27 pushes the whole scale down, giving those transients room above 0 VU where they belong, and letting the needle tell you something useful instead of understating what is happening.
Changing this moves every meter's zero point. It does not change the audio — it changes what the meters call zero, and therefore what the STAGE readouts prescribe.
SKIN — switches the faceplate between Light and Dark mode. Cosmetic only; it has no effect on audio or on metering behaviour. Pick whichever holds up in your room — dark rooms and long sessions usually favour Dark, bright rooms Light. One design, two skins: only the metal changes — glass, meters and the pink ramp carry over.
Working method
A sequence that uses the plugin the way it was designed:
Stage in. INPUT GAIN until the INPUT needle sits at 0 VU and STAGE IN stops prescribing.
Set the depth. PEAK REDUCTION until the reduction needle moves musically on the loudest passages. Watch the needle’s motion more than its value — you are looking for it to breathe with the part.
Listen for the tail. Because release is program-dependent, the compressor sounds different after a loud phrase than a quiet one. Let it run through a full section before judging.
Match the output. OUTPUT GAIN until STAGE OUT reads IN/OUT matched.
Bypass and compare. Now the comparison is honest.
Consider MIX. If the compression is doing what you want but taking life with it, pull the mix back to 60–80% rather than reducing the compression.
Trial and licensing · troubleshooting
OPTO Comp installs as a fully functional 30-day trial. Nothing is disabled, nothing is muted, no noise is injected. A header banner shows the time remaining.
When the trial ends the plugin outputs silence and displays a persistent banner. Your session, settings and automation are preserved — entering a licence restores audio immediately, exactly where you left off.
Entering your licence. Purchase delivers a licence key by email. Paste it into the plugin's licence dialogue. That one moment needs a connection — it activates this machine and stores the activation locally. From then on the plugin works offline.
Re-checks and working offline. The plugin revalidates quietly in the background from time to time. If it cannot reach the server — no network, a plane, a studio that stays off the internet — it carries on working. The check fails open, never closed, and it runs outside the audio path, so it cannot interrupt a session, mute a mix or stall a render. An activated machine keeps working for a long stretch without a connection before it asks to see the internet again.
Machines. One licence covers more than one machine at a time — a laptop, a studio machine, a spare. Deauthorize, in the licence dialogue, removes the licence from the current machine, returns it to trial state and frees the slot, so the same key can be entered elsewhere. Moving beyond the limit means releasing a slot first; if the slots are held by machines you no longer have, support can clear them.
Lost your licence? Retrieve it from My Account using the address you purchased with, or write to support@zeropink.net with your order details.
Troubleshooting
The plugin does not appear in my DAW. Restart the DAW after installing. Logic rescans on launch and will validate the AU the first time it sees it. If it still does not appear, check that the DAW is not running in Rosetta.
The meters barely move. Your session is running well below −18 dBFS reference, or the INPUT GAIN has not been set. Follow the STAGE IN prescription.
The compressor is not catching my transients. It is not meant to. See "What it is not good at".
The trial banner says expired but I purchased. The key has to be entered in the plugin — purchasing does not unlock it automatically. The licence key is in your purchase email; paste it into the licence dialogue.
Specifications
Latency
Reported to the host at every setting, so delay compensation is exact. The figure in samples is fixed; the time it represents shortens as the session rate rises.
At the 4× default this is well under 1.5 ms at any rate — low enough to track through. Set OS Live to Off if you need a genuinely zero-latency path while recording.