ZEROPINK | FET Comp
Before anything else:
get to zero.
FET Comp assumes you have set your level before you start compressing. That is not housekeeping — it is the whole method, and every ZEROPINK plugin is built around it.
0 VU = −18 dBFS. That is the reference the meters are calibrated to, and where analogue equipment expects to be fed. Modern digital sessions routinely run 15–20 dB hotter, which is why compressors that sound effortless on one engineer's mix sound crushed and lifeless on another's.
On a FET compressor this matters more than on any other topology, because INPUT GAIN is the compression control. There is no threshold knob to compensate with. Arrive 12 dB hot and you are already deep into reduction before touching anything, and every ratio will sound like the wrong one.
- Play the loudest section of the part.
- Bring the INPUT needle to around 0 VU — clip or region gain in your DAW is the better fix; INPUT GAIN on the plugin reaches reference and then drives past it.
- Only then pick a ratio.
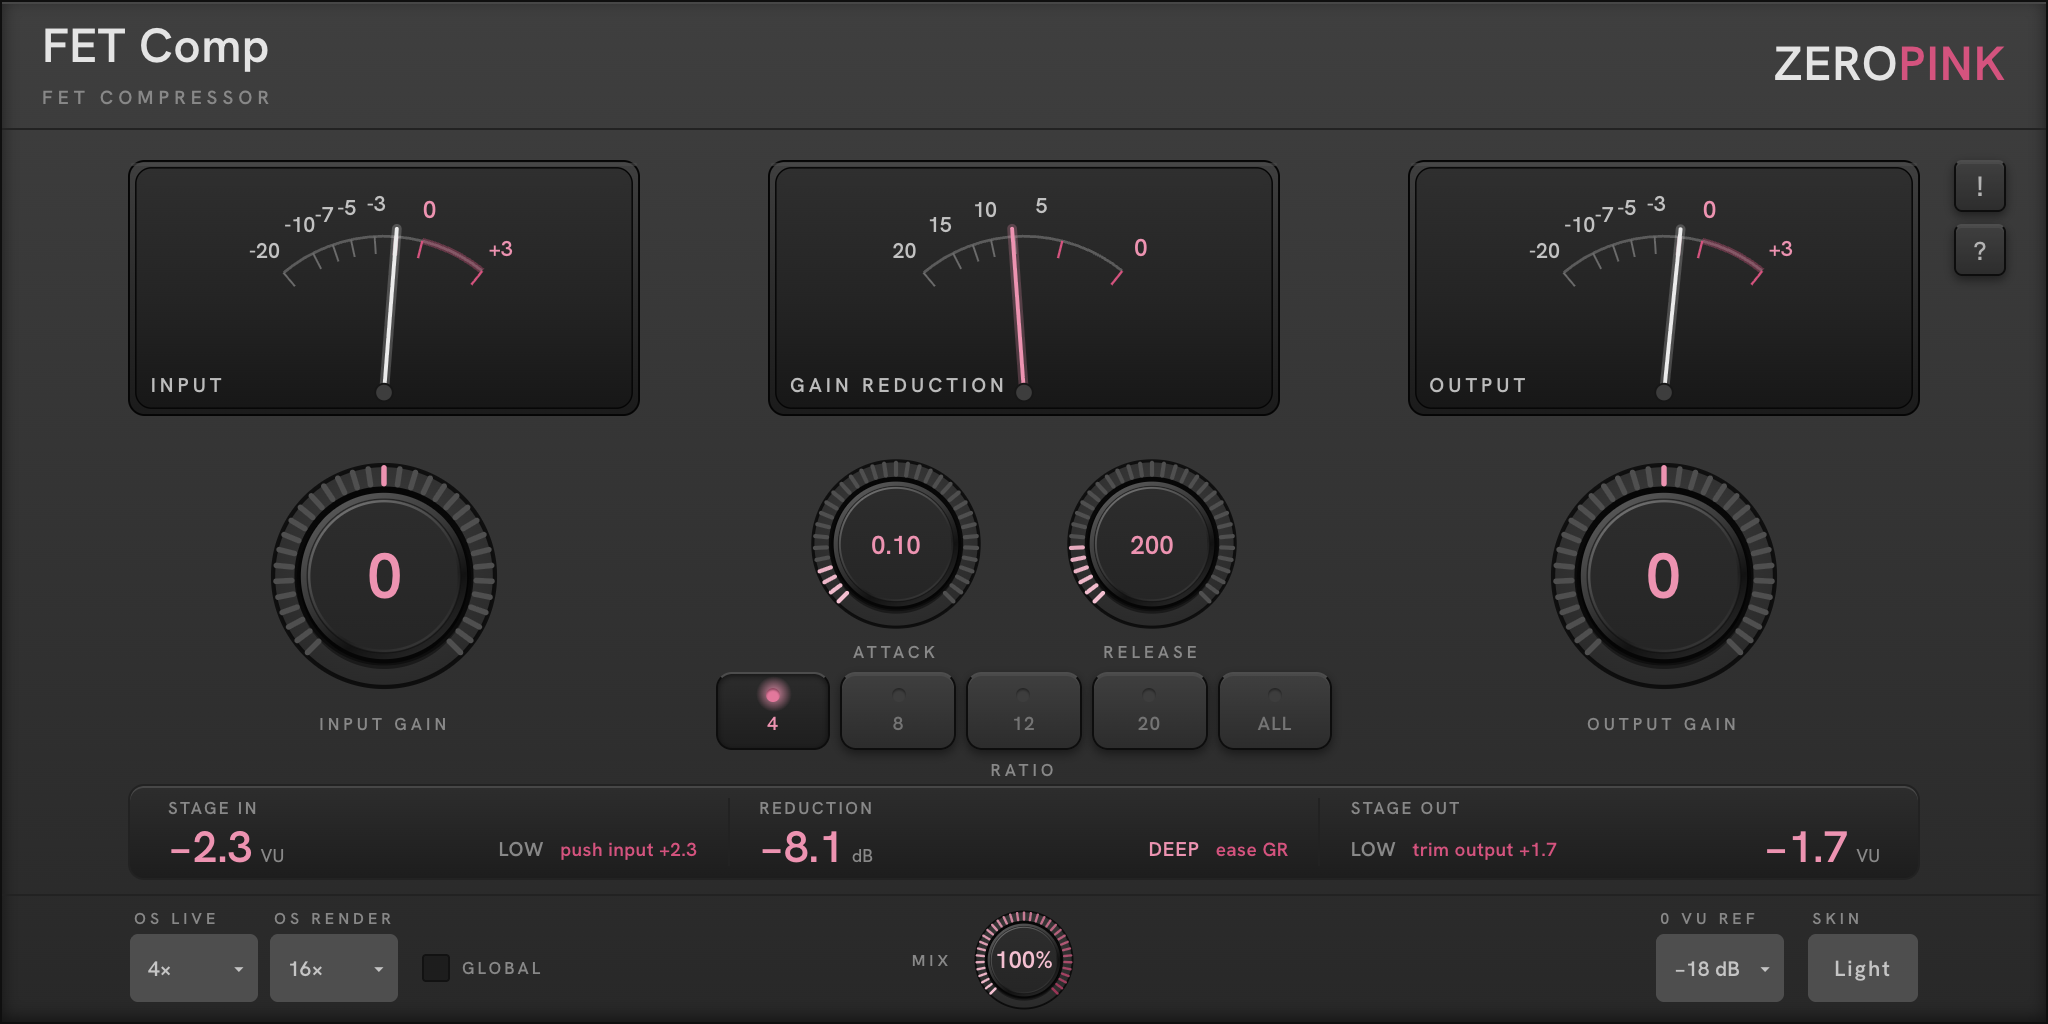
The STAGE IN readout tells you exactly how far off you are and what to do about it. It does not report a number and leave you to interpret it — it names the state and prescribes the correction:
That reads: you are 1.7 dB below reference, and the fix is to add 1.7 dB of input gain. When you land, the state word changes and the prescription disappears.
Reaching 0 VU is the starting line, not the finish. On this plugin you then push past it deliberately — but from a known place, so you can hear what the drive is doing rather than discovering it.
The fastest compressor
ever built.
The 1176 — the most recorded compressor in history, on drums, vocals and rooms for over fifty years. A field-effect transistor clamps the gain in microseconds, orders of magnitude faster than a photocell — rebuilt here with precise digital control.
That speed is the entire character. It catches the front edge of a transient rather than arriving after it, and clamping that fast generates harmonics of its own. The distortion is not a side effect — it is why five decades of engineers have reached for it.
It has no threshold control — the hardware never did. You raise the signal to the fixed threshold with INPUT GAIN and make the level back up with OUTPUT GAIN. Those two knobs, worked against each other, are the compressor.
Ratio is a button bank, as on the original’s four switches. Engage all of them at once — the famous misuse — and the circuit does something it was never designed to do. The legacy is honest, down to the button.
Drums — snare, kick, room mics, whole kits. Rock and pop vocals that need to sit forward and stay there. Bass that has to be felt at a constant level. Electric guitar. Anything where you want to hear the compression and want the attack shortened.
Transparency. If the brief is "hold the level without anyone noticing", this is the wrong tool — that is OPTO Comp territory. FET Comp on a delicate acoustic performance or a finished mix will usually be too fast, too obvious and too coloured, and no amount of gentle setting hides it.
A useful test: if you find yourself trying to make FET Comp disappear, you want a different compressor. Use it when the colour is the point.
The slowest setting
is under a millisecond.
How fast the FET clamps once the signal passes the fixed threshold. Note the range: the slowest setting here is under a millisecond. There is no slow attack on this plugin, because there was none on the circuit.
Fully fast catches the front edge of a transient and removes it — a snare loses its crack and becomes body. Backing off toward 0.8 ms lets the initial hit pass before the clamp lands, which is how you keep the stick and still compress everything behind it.
How quickly gain returns. Short release re-opens between hits, which pulls up everything in the gaps — that is where density, room and pump come from. Long release stays down through a phrase and sits transparently behind the source.
Release interacts with tempo more than any other control here. A release that returns just as the next hit arrives locks to the groove; one that returns slightly late drags the feel.
On low bass, a short release can track the waveform itself rather than the envelope — and you hear it as distortion rather than as compression. If a bass part sounds gritty at moderate reduction, lengthen the release before you reach for anything else.
Five caps rather than a knob.
On the hardware these were physical switches, and only one could sensibly be down at a time — which is why holding several in at once became a famous accident rather than a feature.
All buttons in
Engaging every cap simultaneously puts the sidechain into a state the circuit was not designed for. The knee distorts, the ratio becomes non-monotonic, the attack and release curves shift, and the whole thing generates far more harmonic content than at any single ratio.
The result is unmistakable and completely uncontrolled: thick, distorted, forward, with the room and the decay hauled up level with the hits. It has been used on drums on hit records for fifty years and is still the fastest route to a big, obviously-compressed sound.
ALL is not a louder version of 20. It is a different behaviour — do not treat it as the end of the ratio ladder. Reach for it when you want the effect, and use MIX to dose it.
Ratio and drive together
Ratio and INPUT GAIN work together, not separately. A higher ratio at the same drive gives more reduction and a harder knee; the same reduction can usually be reached from either direction, and the two routes sound different.
If a setting is close but too aggressive, try dropping a ratio and adding drive before you change anything else.
Read level, judge speed by ear.
All three are true VU — around 300 ms integration, IEC/ASA ballistics. They show what you would feel, not sample peaks. On a compressor this fast that gap is worth remembering: the FET is acting on events the needle is too slow to draw.
Input
Level arriving at the FET stage, after INPUT GAIN. This is the one you set first, and then the one you push deliberately.
Gain Reduction
How much gain is being removed, reading right to left from 0. Expect it to snap rather than glide; that is the topology behaving correctly.
Output
Level leaving the plugin, after OUTPUT GAIN. Bring this back alongside the input needle so you judge tone, not loudness.
INPUT and OUTPUT share one scale — −20 · −10 · −7 · −5 · −3 · 0 · +3 — with the stretch above 0 marked in pink. That region is not a warning light; it is the working headroom above reference, and on this plugin you will visit it on purpose. GAIN REDUCTION carries its own scale — 20 · 15 · 10 · 5 · 0 — reading right to left, so the needle rests at 0 and travels left as reduction deepens.
KISS · RIDE · DEEP · CRUSH
The REDUCTION readout names how hard the compressor is working and tells you which way to go. Because there is no threshold, ease GR means reduce INPUT GAIN or drop a ratio — those are the only two ways down.
Oversampling, split for a reason.
OS Live / OS Render
Oversampling for the nonlinear stage, set independently for playback and export. Work at 4× — low latency, light CPU, audibly fine — and let the render setting (16× default) take over on export. The render figure is the one that reaches the listener.
This setting earns its keep harder on FET Comp than on any other ZEROPINK compressor: a microsecond-fast clamp and an all-buttons ratio generate a great deal of harmonic content, and every one of those harmonics is a candidate for folding.
Mix · 0 VU Ref · Skin
MIX is the control that makes the extreme settings usable. ALL buttons in at 100% is often too much of everything; the same setting at 30–40% keeps the density and the room lift while the dry signal restores the transients you just destroyed.
0 VU REF moves every meter's zero point — it does not change the audio, it changes what the meters call zero and therefore what the STAGE readouts prescribe. SKIN switches the faceplate between light and dark; cosmetic only.
Global · Help
GLOBAL applies the oversampling setting across all ZEROPINK plugins in the session, not just this instance. Switch one to 16× for a render and every ZEROPINK plugin in the project follows.
Two small caps sit at the top right of the meter row. ! latches help mode: hover any control and a card rises with a one-line explanation. ? opens the manual.
Six moves, in order.
Stage in. INPUT GAIN until the INPUT needle sits at 0 VU and STAGE IN stops prescribing. This is the reference you will drive from.
Pick a ratio. Start at 4 for anything melodic, 8 or 12 for drums. Choose the behaviour first; find the amount afterwards.
Drive it. Push INPUT GAIN past reference until REDUCTION reads RIDE — the panel’s classic 3–6 — or further if you want to hear it.
Shape with ATTACK. Decide whether you want the transient kept or removed, then set release to the tempo of the part.
Match the output. OUTPUT GAIN until STAGE OUT reads IN/OUT matched, then bypass and compare. Now the comparison is honest.
Dose with MIX. If the compression is doing what you want but has taken the life with it, pull the mix back rather than backing off the drive — you keep the colour and get the transients returned.
Reported to the host at every setting, so delay compensation is exact. The figure in samples is fixed; the time it represents shortens as the session rate rises.
At the 4× default this is well under 1.5 ms at any rate — low enough to track through. Set OS Live to Off if you need a genuinely zero-latency path while recording.
Thirty days, nothing held back.
FET Comp installs as a fully functional 30-day trial. Nothing is disabled, nothing is muted, no noise is injected. A header banner shows the time remaining.
When the trial ends the plugin outputs silence and displays a persistent banner. Your session, settings and automation are preserved — entering a licence restores audio immediately, exactly where you left off.
Purchase delivers a signed licence block by email. Paste it into the plugin's licence dialogue. Verification happens offline on your machine; the plugin never contacts a server, and it will keep working forever on a machine with no internet connection.
Deauthorize removes the licence from the current machine, returning it to trial state, so you can move it to another. There is no activation limit and no account to log into.
The plugin does not appear in my DAW. Restart the DAW after installing. Logic rescans on launch and will validate the AU the first time it sees it. If it still does not appear, check that the DAW is not running in Rosetta.
There is no threshold control. Correct — there was none on the circuit. Use INPUT GAIN to reach the fixed threshold and OUTPUT GAIN to make the level back up.
It sounds distorted. Some of that is the design. If it is more than you want: lower INPUT GAIN, drop a ratio, lengthen RELEASE, or raise OS RENDER — in that order.
My bass sounds gritty. A short release on low-frequency material tracks the waveform rather than the envelope. Lengthen RELEASE toward 800 ms.
The trial banner says expired but I purchased. The licence has to be entered in the plugin — purchasing does not unlock it automatically, because verification is offline.
Lost your licence? Retrieve it from My Account, or read the full support pages. The 30-day trial download above is direct — no email required.